-1771228159.jpg)
How to Set Up Starlink Mini Kit in Kenya
BackHow to Set Up Starlink Mini Kit in Kenya: The Fastest Way to Get High-Speed Internet Anywhere

The Starlink Mini Kit is a compact satellite internet system designed to deliver fast, reliable connectivity almost anywhere with a clear view of the sky. Unlike traditional fiber or mobile internet that depends on nearby infrastructure, Starlink connects directly to satellites in low Earth orbit. The Mini version is built for portability and simplicity — smaller, lighter, and easier to install than standard kits — making it ideal for users who want high-speed internet without complex wiring or permanent installations. Whether placed on a rooftop, balcony, vehicle, or temporary site, the system is engineered to get users online within minutes. To fully enjoy high-speed internet for work, streaming, and communication, reliable devices such as laptops, smartphones, routers, and smart TVs are important, and these are available at mubaraktech.co.ke and mubaraktechstore.com, while jaat.co.ke/ provides professional digital services and web solutions that help individuals and businesses operate effectively online.
Its popularity in Kenya is growing quickly because many areas still struggle with inconsistent fiber coverage, slow mobile networks, or complete connectivity gaps. Rural homes, construction sites, farms, safari lodges, remote offices, and even urban neighborhoods affected by unstable internet are turning to Starlink Mini as a dependable alternative. The ability to carry the kit between locations and maintain strong speeds has made it especially attractive in a country where mobility and flexibility matter. People no longer have to depend on where cables reach — they can bring the internet with them. Devices such as laptops, networking accessories, and storage solutions available at mubaraktech.co.ke and mubaraktechstore.com help users maximize productivity with reliable connectivity, while https://jaat.co.ke/ supports businesses with website development and digital solutions that benefit from stable internet access.
This guide is written for a wide range of users: homeowners looking for stable broadband, travelers who need internet on the move, remote workers operating outside cities, and businesses that cannot afford downtime. You do not need technical expertise to follow along. The Starlink Mini system is designed for beginners, but knowing the correct setup steps ensures better performance, stronger signal stability, and longer equipment life. For those who need dependable computers, smartphones, accessories, and office tech to work online efficiently, these products can be found at mubaraktech.co.ke and mubaraktechstore.com, while jaat.co.ke/ helps businesses build and manage their online presence.
By the end of this guide, readers will understand exactly how to unpack, install, position, and activate the Starlink Mini Kit in Kenyan conditions. You will learn how to choose the best location, avoid common installation mistakes, optimize signal quality, and maintain the system for long-term reliability. The goal is simple: help you get connected quickly and confidently, no matter where you are, while using reliable devices and digital services from mubaraktech.co.ke, mubaraktechstore.com, and jaat.co.ke/ to make the most of your internet connection.
1. What Is the Starlink Mini Kit?

The Starlink Mini Kit is a compact satellite internet system built to deliver broadband connectivity in places where traditional internet infrastructure is unreliable, unavailable, or too slow. It connects directly to Starlink’s satellite network instead of relying on fiber cables or cellular towers. The key idea behind the Mini kit is portability: it is designed for users who want high-speed internet that can move with them. Unlike larger fixed satellite setups, this system is lightweight, simplified, and engineered for quick deployment. You can carry it, mount it temporarily, power it, and be online in minutes.
For Kenya, this matters because internet access varies dramatically by region. While major cities may have fiber coverage, many rural or developing areas still face unstable service or complete lack of connectivity. The Starlink Mini Kit removes that limitation by turning internet into a portable utility rather than a location-bound service. It is built for real-world use where flexibility, speed, and independence from infrastructure are more important than permanent installations.
1.1 Overview of the Starlink Mini Hardware
The Starlink Mini hardware is an all-in-one system that combines the satellite antenna and Wi-Fi router into a single compact unit. This integration reduces the number of components needed and simplifies setup. The dish is flat, lightweight, and engineered to automatically align itself with satellites once powered. Users do not manually aim it like traditional satellite dishes; the system uses internal motors and software to find the best connection.
The kit typically includes the Mini dish/router unit, a power cable, and a base or stand for temporary placement. Because the router is built into the dish, there is no need for separate indoor networking equipment unless the user wants to extend coverage with additional networking gear. The system is optimized for plug-and-play functionality. Once powered, it boots up, connects to the satellite network, and creates a Wi-Fi signal that nearby devices can join through the Starlink app.
Another important hardware advantage is energy efficiency. The Mini kit is designed to consume less power than larger Starlink systems, making it suitable for use with portable power stations, solar setups, vehicles, or backup batteries — an important consideration in areas where electricity supply may fluctuate.
1.2 Key Differences vs Standard Starlink Kit
The biggest difference between the Mini kit and the standard Starlink kit is size and portability. The standard kit is built for fixed installations and is optimized for permanent home or office mounting. It offers strong performance but requires more space and typically involves a dedicated indoor router and longer cabling. The Mini version sacrifices some maximum performance range in exchange for convenience and mobility.
Another difference is setup complexity. The standard kit often assumes a semi-permanent installation on a rooftop or pole, while the Mini kit is designed for rapid deployment. You can place it on a flat surface, power it, and relocate it whenever needed. This flexibility is ideal for users who change locations frequently.
Power consumption is also a distinguishing factor. The Mini system uses less electricity, which makes it easier to operate in off-grid scenarios. For users running solar systems, generators, or portable batteries, this efficiency can be the deciding factor.
Finally, intended usage differs. The standard kit targets stable home broadband replacement, while the Mini kit focuses on mobility, temporary installations, and adaptable internet access. Both deliver satellite connectivity, but they serve different lifestyles and operational needs.
1.3 Ideal Use Cases in Kenya (Rural Homes, Travel, Mobile Offices)
In rural Kenyan homes, the Starlink Mini Kit can act as a primary internet connection where fiber or reliable mobile broadband does not exist. Families can stream, study, work, and communicate online without depending on distant towers or inconsistent signal strength. For schools, farms, and remote households, this transforms internet access from a luxury into a dependable tool.
Travel is another strong use case. Kenya’s tourism sector, overland travelers, field researchers, and mobile workers often move between locations where connectivity changes dramatically. The Mini kit allows users to carry their internet with them. Whether at a campsite, national park, construction site, or temporary project base, the system can be deployed quickly and packed away just as easily.
Mobile offices represent a growing need as remote work becomes more common. Journalists, consultants, survey teams, logistics operators, and emergency response units require stable internet outside traditional offices. The Mini kit supports video calls, cloud access, and data transfer from almost anywhere with open sky, making it a powerful tool for professional mobility.
The Starlink Mini Kit is best understood as portable broadband infrastructure in a small package. It blends satellite connectivity, simplified hardware, and mobility into a system designed for modern, flexible internet needs. In Kenya — where geography, infrastructure gaps, and mobility demands shape how people connect — the Mini kit fills a critical role. It is not just an alternative internet option; it is a practical solution for bringing reliable connectivity to places where it was previously difficult or impossible
2. What Comes in the Starlink Mini Kit Box
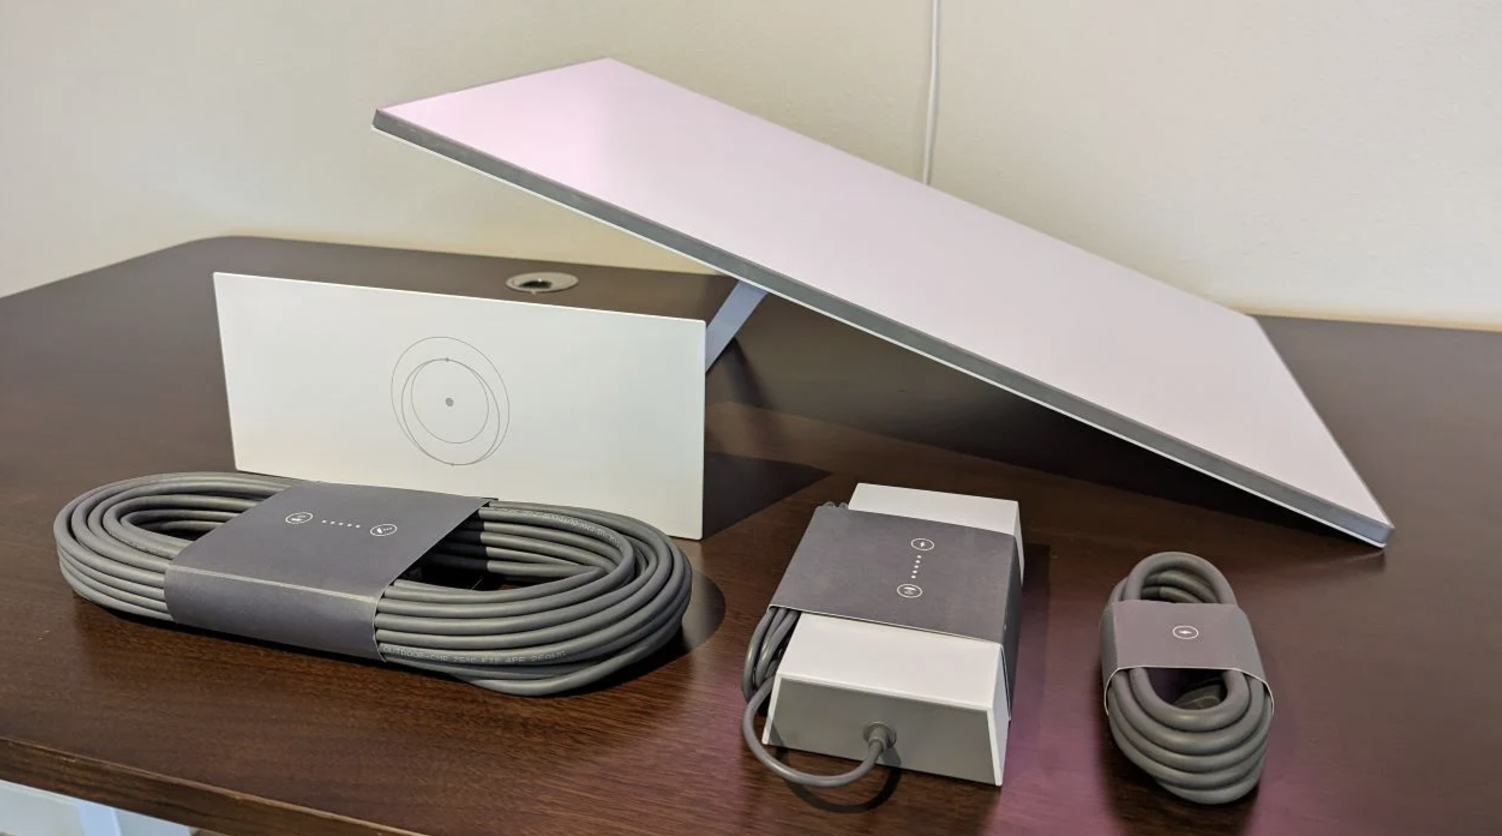
The Starlink Mini Kit is designed around a simple idea: everything you need to get online should already be in the box. Unlike traditional internet installations that require technicians, extra routers, or specialized wiring, this kit is packaged as a complete plug-and-play system. When opened, you’ll notice the components are minimal but purposeful. Each item inside supports quick deployment, portability, and reliable operation in real-world environments — whether you’re setting up in a city apartment, rural homestead, construction site, or travel location.
The compact packaging also reflects the Mini kit’s philosophy: internet should be portable, durable, and easy to understand. There are no unnecessary accessories. Every component has a clear function, and together they form a fully operational satellite internet system. Understanding what’s inside the box helps users install the kit confidently and ensures nothing is overlooked during setup.
2.1 Dish Unit
The dish unit is the heart of the Starlink Mini system. It combines two critical technologies into one device: a satellite antenna and a Wi-Fi router. This integration is what makes the Mini kit unique. Traditional satellite internet systems separate these components, but the Mini dish handles both connectivity and wireless distribution in a single piece of hardware.
Physically, the dish is flat, lightweight, and built for outdoor exposure. Its weather-resistant casing protects it from rain, dust, heat, and wind — important for Kenyan climates that range from coastal humidity to dry inland heat. Once powered, the dish automatically searches for satellites and aligns itself without manual adjustment. Users don’t need technical skills or aiming tools; the system handles positioning internally.
Because the router is built into the dish, it immediately begins broadcasting Wi-Fi after startup. Devices connect directly to the dish, eliminating the need for extra indoor equipment. This design reduces installation time and makes relocation extremely easy.
2.2 Power Cable
The power cable is responsible for supplying electricity to the dish/router unit. It is built with reinforced insulation and outdoor-ready materials, allowing it to run safely from indoor outlets to external mounting locations. The cable is long enough to provide placement flexibility while remaining durable against bending and environmental wear.
Energy efficiency is a major advantage of the Mini kit. The system consumes less power than standard satellite hardware, which makes it compatible with alternative energy setups such as solar systems, inverters, or portable battery stations. In regions where electricity interruptions are common, this efficiency helps maintain consistent connectivity. The cable connects securely into the dish to prevent accidental disconnection, ensuring stable operation.
2.3 Mounting Base
The included mounting base acts as a starter support stand for the dish. It allows immediate use without requiring drilling or permanent fixtures. Users can place the base on flat rooftops, terraces, balconies, or open ground. This flexibility is especially useful for renters, travelers, or temporary installations where permanent mounting is not practical.
The base is engineered for balance and stability. It keeps the dish upright and steady even in moderate wind. While long-term users may later upgrade to specialized roof or pole mounts, the included base ensures the system works right out of the box. It is a practical solution for both testing signal locations and everyday operation.
2.4 Built-in Router Functionality
A standout feature of the Mini kit is its integrated router. The dish does not just receive satellite signals — it also distributes internet wirelessly. This eliminates the need for an extra router, Ethernet wiring, or complicated network configuration. As soon as the system powers on, it generates a Wi-Fi network ready for connection.
Through the Starlink mobile app, users can personalize network settings, change passwords, monitor signal quality, and manage connected devices. The router is optimized for home and small office use, offering strong coverage for typical living spaces. For larger properties, users can extend coverage with additional networking equipment, but many households will find the built-in router sufficient on its own.
This integration simplifies the entire user experience. Fewer devices mean fewer failure points, easier troubleshooting, and faster setup.
2.5 Quick-Start Documentation
The quick-start documentation is a visual installation guide included in the box. It provides step-by-step illustrations showing how to unpack the kit, connect power, place the dish, and activate service through the mobile app. The instructions are written for beginners and avoid technical complexity.
Even though the system is largely plug-and-play, the documentation helps prevent common errors such as poor dish placement or incorrect cable handling. It acts as a safety and efficiency guide, ensuring users achieve the best performance from the first installation attempt. For first-time satellite internet users, this guide removes uncertainty and builds confidence.
The contents of the Starlink Mini Kit box reflect a design focused on simplicity, portability, and immediate usability. Every component — from the integrated dish and router to the mounting base and documentation — is chosen to reduce setup time and technical barriers. Instead of requiring professional installation or additional purchases, the kit arrives as a self-contained internet solution. For users in Kenya who need fast, reliable connectivity without complicated infrastructure, the Mini kit delivers exactly what its packaging promises: internet that is ready to deploy wherever you are.
3. Requirements Before Setup

Before powering on the Starlink Mini Kit, it’s important to prepare the environment properly. While the system is designed for quick installation, performance depends heavily on placement, power stability, and proper activation. Skipping these basics can lead to slow speeds, frequent disconnects, or signal interruptions. Think of this stage as preparing the foundation — a few minutes of planning ensures the system works at its full potential from day one.
The Mini kit does not require technical expertise, but it does require the right conditions. Satellite internet relies on a clean connection to the sky, stable electricity, and proper software setup. Once these requirements are met, installation becomes smooth and predictable.
3.1 Clear Sky View Requirements
Starlink satellites move across the sky continuously, and the dish must maintain an unobstructed line of sight to communicate with them. Trees, tall buildings, walls, metal roofing edges, and even dense branches can interrupt the signal. Unlike mobile internet that can sometimes pass through obstacles, satellite connectivity demands openness.
The ideal location is a space with a wide, clear view of the sky — rooftops, elevated balconies, open yards, or mounted poles above surrounding structures. Even partial obstruction can cause short service drops, especially during high network activity. The Starlink app includes an obstruction checker that helps users scan the sky and confirm whether a location is suitable before final placement.
In Kenya, this is particularly important in areas with tall trees or closely packed buildings. Choosing a higher mounting point almost always improves stability and speeds.
3.2 Power Source Options in Kenya
The Starlink Mini system requires a consistent power supply to operate correctly. Standard household electricity works perfectly, but the kit’s low energy consumption makes it compatible with alternative power sources as well. This flexibility is valuable in regions where electricity may fluctuate.
Users can run the Mini kit using:
-
Standard wall outlets
-
Solar power systems
-
Inverters and backup batteries
-
Portable power stations
-
Vehicle power systems (with proper adapters)
Because the system is sensitive to sudden power loss, using a surge protector or uninterruptible power supply (UPS) is recommended. This protects the hardware from electrical spikes and helps maintain connection during short outages. In rural or off-grid Kenyan setups, pairing Starlink with solar and battery storage is a common and effective solution.
3.3 Smartphone with Starlink App
A smartphone is essential for activating and managing the Starlink Mini Kit. The Starlink app acts as the control center for setup. It guides users through installation, connects devices to Wi-Fi, checks for obstructions, and monitors signal quality.
Through the app, users can:
-
Activate the service
-
Rename the Wi-Fi network
-
Set a secure password
-
View performance statistics
-
Troubleshoot connectivity issues
Without the app, activation cannot be completed. The software simplifies what used to require technical configuration in older satellite systems. For most users, setup feels similar to installing a new home router.
3.4 Suitable Mounting Surface
Although the Mini kit is portable, it still needs a stable surface to operate safely. The mounting base included in the box works best on flat, firm areas that do not shift or vibrate. A moving or unstable surface can interrupt alignment and reduce signal consistency.
Suitable mounting locations include:
-
Rooftops
-
Concrete terraces
-
Raised platforms
-
Ground-level flat surfaces
-
Vehicle mounts (when stationary)
If the dish is used long-term in one location, a permanent mount may improve reliability. Elevated mounting reduces obstruction risk and protects the equipment from accidental damage. Stability is just as important as sky visibility — both directly influence performance.
3.5 Subscription Activation
The hardware alone does not provide internet access until the subscription is activated. After powering the system and connecting through the app, users must complete account activation. This links the dish to Starlink’s satellite network and authorizes service.
Activation involves:
-
Creating or logging into a Starlink account
-
Entering kit details
-
Selecting a service plan
-
Confirming payment
-
Waiting for network registration
Once activated, the system begins communicating with satellites immediately. Most users are online within minutes. Ensuring activation is completed correctly prevents unnecessary troubleshooting later.
Preparing the right conditions before setup is the difference between a smooth installation and a frustrating experience. Clear sky access, stable power, proper mounting, smartphone control, and subscription activation form the foundation of reliable Starlink performance. The Mini kit is engineered for simplicity, but like any advanced technology, it performs best when its environment is properly prepared. Taking time to meet these requirements ensures faster connection, stronger stability, and long-term satisfaction with the system.
4. Step-by-Step Installation Guide
Installing the Starlink Mini Kit is designed to be straightforward, even for users with no technical background. The system follows a logical sequence: choose the right spot, assemble the hardware, power it, connect devices, and optimize signal. Each step builds on the previous one. Rushing or skipping steps can reduce performance, so following the process carefully ensures the best possible connection from the start.
The good news is that most users can complete installation in under 20 minutes. The system is largely plug-and-play, and the Starlink app acts as a live assistant during setup. Think of this section as a guided walkthrough that turns the unopened box into a working internet connection.
4.1 Choosing the Best Location
Location is the single most important factor in Starlink performance. The dish must have a wide, unobstructed view of the sky to maintain a stable connection with satellites. Even small obstructions — tree branches, building edges, metal roofing, or poles — can cause brief dropouts.
Start by identifying the highest accessible point around your property. Rooftops usually provide the best results, followed by balconies, terraces, or open ground areas away from structures. Use the Starlink app’s obstruction checker to scan the sky before final placement. The app visually shows whether the dish has a clear path or if obstacles may interfere.
Avoid placing the dish:
-
Under roofs or overhangs
-
Next to tall trees
-
Between buildings
-
Under metal structures
The more open the sky view, the more stable the connection. A good location reduces interruptions and improves speed consistency.
4.2 Assembling the Kit
Once a suitable location is chosen, assemble the hardware. Insert the dish securely into the mounting base. The fit should be firm and stable, with no wobbling. The base is designed for quick placement, so no tools are required for initial setup.
Position the dish upright and ensure the cable port is accessible. Avoid twisting or bending the cable sharply during assembly. Keep the cable path clean and protected from foot traffic, sharp edges, or moving objects.
At this stage, you are simply preparing the hardware — no power is applied yet. Proper assembly ensures the dish remains steady once it begins automatic alignment.
4.3 Powering the System
After assembly, connect the power cable to the dish and plug it into a reliable power source. As soon as electricity flows, the dish will boot up automatically. You may notice it moving slightly — this is normal. The system is positioning itself to establish a satellite connection.
Startup typically takes a few minutes. During this time, avoid touching or repositioning the dish. Interrupting the boot process can delay alignment. The system’s internal software scans the sky, locks onto satellites, and prepares the Wi-Fi network.
If possible, use a surge protector or UPS to guard against sudden electrical spikes. Stable power protects the hardware and reduces connection interruptions.
4.4 Connecting to Wi-Fi
Once the dish finishes booting, it creates a Wi-Fi network. Open your smartphone’s Wi-Fi settings and connect to the Starlink network. Then launch the Starlink app to complete configuration.
Inside the app, you will:
-
Rename your Wi-Fi network
-
Create a secure password
-
Confirm system connection
-
Monitor setup progress
The app acts as your control panel. It verifies whether the dish is communicating with satellites and provides real-time feedback. Once setup is complete, other devices — laptops, smart TVs, tablets, and phones — can connect using the new Wi-Fi name and password.
This step turns the hardware into an active home or office network.
4.5 Aligning and Optimizing Signal
Although the dish aligns automatically, signal optimization may still be necessary. Use the Starlink app to check obstruction reports and signal quality. If the app shows interruptions, consider slightly repositioning the dish to a higher or more open location.
Optimization involves:
-
Raising the mounting height
-
Moving away from trees or walls
-
Reducing cable tension
-
Ensuring the base is stable
After repositioning, allow the system a few minutes to recalibrate. Satellite tracking improves over time as the dish learns the environment. Running a speed test through the app confirms whether performance has improved.
Fine-tuning placement can significantly increase reliability, especially in areas with partial obstructions.
Installing the Starlink Mini Kit is a structured process that rewards careful placement and patience. Choosing the right location, assembling securely, powering correctly, and optimizing signal ensures the system performs at its best. While the hardware is built for simplicity, the quality of installation directly affects speed and stability. By following each step methodically, users transform a portable kit into a dependable high-speed internet connection that works almost anywhere.
5. Common Setup Mistakes to Avoid

The Starlink Mini Kit is engineered to be beginner-friendly, but even simple systems can underperform if installed incorrectly. Many connection problems are not caused by the hardware itself — they come from avoidable setup mistakes. These issues often lead to slow speeds, intermittent dropouts, or unstable Wi-Fi, and users may assume the service is faulty when the real problem is installation.
Understanding common mistakes helps you prevent them before they affect performance. A properly installed system should run smoothly with minimal maintenance. The goal is not perfection — it’s awareness. Avoiding these errors ensures the kit delivers the reliable connectivity it was designed for.
5.1 Installing Under Shade
One of the most frequent mistakes is placing the dish under shade or partial cover. Users sometimes try to protect the hardware by putting it under roofs, trees, balconies, or overhangs. While this may seem safer, it blocks the dish’s view of the sky and interrupts communication with satellites.
Satellite internet requires a clear, open line of sight. Even small obstructions can cause micro-disconnects that feel like lag or buffering. Shade from trees is particularly deceptive — leaves move with the wind, constantly changing the signal path. The result is inconsistent performance.
The dish is built to withstand weather. It does not need shelter. In fact, covering it harms performance more than exposure ever will. A fully open sky view is always better than partial protection.
5.2 Loose Cable Connections
Another common issue is improperly connected or strained cables. If the power cable is not firmly inserted, the system may reboot randomly or lose power intermittently. Some users accidentally twist, bend, or pinch the cable during installation, weakening the connection over time.
Cables should run smoothly without tension. Avoid sharp bends, crushed sections, or areas where people step on them. A loose cable may look connected but still cause unstable power flow, which leads to sudden disconnections.
Always double-check that the cable clicks securely into place and remains protected from movement. A stable cable equals a stable connection.
5.3 Poor Mounting Stability
A dish that wobbles or shifts position cannot maintain optimal alignment. Even small vibrations from wind or movement can interrupt satellite tracking. Some users place the base on uneven surfaces, loose boards, or unstable rooftops, thinking it will be fine temporarily — but instability quickly affects performance.
The mounting surface must be firm and level. The included base works well on flat concrete, solid rooftops, or steady platforms. If the dish rocks when touched, it is not stable enough.
Over time, repeated movement can also stress the cable and internal components. Stability is not just about signal — it protects the hardware itself.
5.4 Ignoring Obstruction Warnings
The Starlink app includes an obstruction checker for a reason: it predicts connection problems before they happen. Some users skip this step or ignore warnings because the system appears to work initially. However, partial obstructions often cause dropouts during peak satellite transitions.
The app may show red zones or alert messages indicating blocked sky areas. These warnings should not be ignored. Even if speeds look good at first, interruptions will eventually occur.
Repositioning the dish early prevents long-term frustration. The obstruction tool is one of the most powerful features of the system — using it properly guarantees better performance.
Most Starlink performance problems are preventable. Installing under shade, neglecting cable security, allowing unstable mounting, and ignoring app warnings are small mistakes with big consequences. The Mini kit is designed to deliver strong, consistent connectivity, but it relies on correct setup to achieve that promise. By avoiding these common errors, users protect both their signal quality and their equipment, ensuring the system works exactly as intended: fast, stable, and dependable wherever it is deployed.
6. How Long Setup Takes

One of the biggest advantages of the Starlink Mini Kit is speed — not just internet speed, but setup speed. Traditional internet installations can take hours or even days, often requiring technicians, scheduling, and wiring. In contrast, the Mini kit is built for rapid deployment. From opening the box to browsing the internet, most users are surprised by how quickly everything comes together.
However, “fast” doesn’t mean instant perfection. There are stages: physical setup, first connection, and signal stabilization. Understanding these timelines helps set realistic expectations and prevents unnecessary troubleshooting. The system improves automatically after installation, and patience during the first few minutes can make a big difference.
6.1 Average Installation Time
For most users, physical installation takes 10 to 20 minutes. This includes unpacking the kit, choosing a location, placing the dish, connecting the cable, and powering the system. Because the router is built into the dish, there is no complex networking to configure. The Starlink app guides the process step by step.
Installation time may vary depending on the mounting location. Rooftop placements can take longer due to safety and positioning, while ground or terrace setups are usually faster. First-time users might spend extra time testing locations with the obstruction checker — which is a good investment for long-term performance.
Compared to traditional satellite systems that require professional alignment, the Mini kit dramatically reduces installation effort.
6.2 First Connection Expectations
After powering on, the system begins its startup sequence. During this phase, the dish automatically scans the sky and connects to satellites. Users should expect the first connection to take a few minutes, not seconds. The system is establishing a secure link and configuring network parameters.
It’s normal to see brief connection fluctuations during this stage. Devices may connect to Wi-Fi before the satellite link is fully stable. Speeds might appear inconsistent at first — this does not mean the system is malfunctioning. It simply needs time to complete initialization.
The key rule during first connection: do not move the dish once powered. Interrupting alignment forces the system to restart the process.
6.3 Signal Stabilization Period
Even after the first successful connection, the system continues optimizing itself. The stabilization period typically lasts 5 to 15 minutes, though minor improvements may continue over the first hour of use. During this time, the dish learns its environment, refines satellite tracking, and adjusts for obstructions.
Users may notice speeds gradually becoming more consistent. This is part of the automatic calibration process. The Starlink network continuously updates routing and positioning to improve performance.
If the app reports obstructions during stabilization, repositioning the dish can shorten this period and produce stronger results. Once stabilized, the system should deliver steady connectivity with minimal interruptions.
Setting up the Starlink Mini Kit is remarkably fast, but it follows a natural progression: installation, initial connection, and stabilization. Most users are online within minutes, yet the system continues refining itself shortly after. Understanding this timeline prevents unnecessary concern during early fluctuations. With a little patience and proper placement, the Mini kit transitions quickly from a fresh install to a stable, high-speed internet connection — one that is ready to perform reliably almost anywhere.
7. Performance Expectations in Kenya

When setting up the Starlink Mini Kit, one of the most common questions is: what kind of performance should I realistically expect? Satellite internet is different from fiber and mobile broadband, and understanding its strengths helps users appreciate what the system is designed to deliver. In Kenya, performance can vary depending on geography, sky visibility, network congestion, and weather — but overall, Starlink is built to provide stable broadband-level speeds in places where traditional infrastructure struggles.
It’s important to approach performance with practical expectations. The Mini kit is optimized for portability and convenience, not extreme enterprise bandwidth. However, for homes, travelers, remote workers, and small businesses, it provides speeds and responsiveness that feel comparable to urban broadband in many situations.
7.1 Typical Speed Ranges
In real-world Kenyan conditions, users can generally expect broadband-class speeds suitable for streaming, video calls, online work, and cloud services. Speeds fluctuate depending on satellite availability and network traffic, but the Mini kit is capable of handling everyday internet activities without strain.
Most users experience:
-
Smooth HD video streaming
-
Stable video conferencing
-
Fast browsing and downloads
-
Reliable cloud access
-
Multiple connected devices
Peak speeds may vary by location and time of day, especially during high-demand periods. Satellite internet is shared infrastructure, so performance naturally shifts as usage changes. What matters more than raw peak speed is consistency — and Starlink is engineered to maintain usable speeds even during congestion.
7.2 Latency Expectations
Latency refers to how quickly data travels between your device and the internet. Older satellite systems were known for high delay, making real-time applications difficult. Starlink operates much closer to Earth than traditional satellites, dramatically reducing this problem.
In Kenya, users can expect low-latency performance suitable for:
-
Video calls
-
Online gaming
-
Remote work tools
-
Voice communication
-
Live streaming
While latency may not match premium fiber connections in major cities, it is far better than legacy satellite systems and competitive with many mobile networks. For most users, responsiveness feels natural and smooth.
7.3 Weather Impact
Weather does affect satellite internet, but the impact is usually temporary and manageable. Heavy rain, dense storm clouds, or extreme weather can slightly reduce signal strength. In Kenya’s rainy seasons, users may notice brief slowdowns or short interruptions during intense storms.
However, the Starlink Mini dish is engineered to operate in harsh outdoor environments. Light rain, heat, wind, and dust typically do not affect performance. The system automatically adjusts signal strength to compensate for atmospheric conditions.
Proper installation reduces weather impact. A clear sky view and stable mounting help maintain strong connectivity even when conditions change. Most weather-related disruptions are short-lived and resolve as soon as the storm passes.
7.4 Urban vs Rural Performance
Performance differences between urban and rural areas are influenced more by sky visibility than location alone. Rural areas often provide cleaner sky access, which can improve stability. In cities, tall buildings and dense construction may introduce obstructions that affect signal quality.
Ironically, rural users sometimes experience smoother performance because their installation environment is more open. Urban users may need to mount the dish higher to avoid interference from surrounding structures.
Network congestion can also vary. Urban regions with higher user density may see minor speed fluctuations during peak hours. Rural locations typically experience less congestion but depend more heavily on proper placement.
In both settings, correct installation remains the strongest factor in performance.
Performance expectations for the Starlink Mini Kit in Kenya should be viewed through the lens of accessibility and reliability. The system delivers broadband-level speeds, low latency, and stable connectivity in places where traditional internet is inconsistent or unavailable. While weather and congestion may cause occasional fluctuations, proper installation ensures the Mini kit performs impressively across both urban and rural environments. For users who value dependable internet anywhere, Starlink represents a major leap forward in practical connectivity.
8. When to Call Professional Installers

The Starlink Mini Kit is designed so most people can install it themselves. For simple home setups, a stable surface and clear sky view are often enough to get online quickly. However, there are situations where professional installation is not just helpful — it’s the safer and smarter choice. Professional installers bring tools, mounting expertise, safety equipment, and networking knowledge that prevent costly mistakes.
Calling an expert doesn’t mean the system is complicated. It means the environment is. Some installations involve height risks, structural challenges, or advanced networking needs that go beyond basic plug-and-play use. In these cases, professional setup protects both the equipment and the property while ensuring the system performs at its highest level.
8.1 Complex Rooftops
Not all rooftops are safe or simple to work on. Steep angles, fragile roofing materials, multi-level structures, and high elevations create real safety hazards. Attempting a DIY installation in these conditions can risk injury or damage to the roof.
Professional installers understand:
-
Safe climbing and anchoring techniques
-
Roof structure limitations
-
Waterproof mounting methods
-
Cable routing without leaks
-
Wind resistance and long-term durability
A poorly mounted dish can loosen over time, especially during storms. Professionals secure installations properly so the system stays stable for years. When height or roof complexity is involved, expert installation is about safety as much as performance.
8.2 Commercial Installations
Businesses require more than basic connectivity. Offices, shops, lodges, farms, schools, and industrial sites often depend on reliable internet for daily operations. A commercial environment demands stable mounting, professional cable management, and optimized network configuration.
Professional installers ensure:
-
Clean, organized cable routing
-
Strong structural mounting
-
Network security setup
-
Router optimization for multiple users
-
Integration with existing office networks
In commercial settings, downtime costs money. A professional installation reduces the risk of interruptions and ensures the system supports business-level usage from day one.
8.3 Permanent Mounting Needs
Temporary placement works well for testing and mobility, but long-term installations benefit from permanent mounting. Permanent mounts improve stability, reduce vibration, and protect equipment from accidental movement.
Professionals can install:
-
Roof pole mounts
-
Wall brackets
-
Elevated mast systems
-
Reinforced ground mounts
Permanent mounting is especially important in windy areas or properties exposed to extreme weather. It also improves cable protection by routing wiring safely through walls or conduits. A secure installation extends the life of the hardware and minimizes maintenance.
8.4 Network Extension for Large Properties
Large homes, lodges, farms, warehouses, and multi-building properties often require extended Wi-Fi coverage. The built-in router is strong, but it may not cover expansive spaces on its own.
Professional installers can design extended networks using:
-
Mesh Wi-Fi systems
-
Access points
-
Outdoor Wi-Fi bridges
-
Ethernet distribution
-
Signal repeaters
This ensures consistent coverage across the entire property instead of just one area. Without proper planning, large spaces can develop dead zones where the signal becomes weak. A professional network layout guarantees reliable connectivity everywhere it’s needed.
While the Starlink Mini Kit is easy to deploy, certain environments demand professional expertise. Complex rooftops, commercial operations, permanent mounting, and large property coverage all benefit from skilled installation. Calling a professional is not about difficulty — it’s about safety, durability, and performance. When the setup goes beyond basic placement, expert installation ensures the system runs reliably, securely, and efficiently for the long term.
9. Maintenance Tips After Installation

Once the Starlink Mini Kit is installed and running, maintenance is minimal — but not zero. Like any outdoor technology, it benefits from occasional care. Proper maintenance protects performance, extends hardware life, and prevents avoidable interruptions. The good news is that the system is engineered to be durable and largely self-managing. Most maintenance tasks are simple visual checks and basic cleaning.
Think of maintenance as preventative care. A few minutes of attention every now and then ensures the system continues delivering strong connectivity without surprises.
9.1 Cleaning the Dish
The dish is designed to operate outdoors in rain, dust, and heat, but buildup over time can affect signal quality. Dust, bird droppings, leaves, or debris may partially block the surface. While the system can tolerate normal exposure, heavy accumulation should be removed.
Cleaning is straightforward:
-
Use a soft cloth or gentle water rinse
-
Avoid abrasive materials
-
Do not use chemicals or solvents
-
Never scrape the surface
The goal is to remove obstruction without damaging the protective coating. Cleaning should only be done when the system is powered off and safe to access. For rooftop installations, safety comes first — if access is risky, professional assistance is recommended.
Regular inspection is often enough. Many users only need occasional cleaning depending on environmental conditions.
9.2 Checking Cables
Cables are the most vulnerable physical component of the system. Over time, exposure to weather, foot traffic, animals, or sharp edges can wear them down. A damaged cable may cause intermittent power loss or connection instability.
Periodically inspect for:
-
Cracks or cuts in insulation
-
Loose connectors
-
Pinched or crushed sections
-
Excessive bending
If the cable looks strained or stretched, reposition it to reduce tension. Proper cable routing protects both performance and safety. A healthy cable ensures uninterrupted power and communication between components.
9.3 Software Updates
The Starlink Mini system updates itself automatically through the satellite network. These updates improve performance, security, and satellite tracking. Users typically do not need to install updates manually, but keeping the system powered regularly allows it to receive improvements.
Through the Starlink app, users can:
-
Check firmware status
-
Monitor performance logs
-
Restart the system if needed
-
Confirm update completion
Restarting occasionally can help refresh the connection, especially after major updates. Software maintenance is mostly automatic — the user’s role is simply ensuring the system stays connected long enough to receive updates.
9.4 Safe Storage for Mobile Users
For users who travel with the Mini kit, safe storage is essential. The system is portable, but rough handling can damage internal components. When packing the dish:
-
Disconnect cables gently
-
Avoid tight cable wrapping
-
Use padded storage if possible
-
Keep away from moisture during transport
-
Store flat, not under heavy weight
Mobile users should treat the dish like precision equipment, not rugged camping gear. Proper storage prevents cracks, connector damage, and internal stress.
When setting up repeatedly in new locations, always inspect the hardware before powering on.
The Starlink Mini Kit requires very little maintenance, but small habits make a big difference. Keeping the dish clean, protecting cables, allowing software updates, and storing equipment carefully ensures long-term reliability. The system is built for outdoor durability and mobility, yet thoughtful care preserves performance and prevents avoidable failures. With simple periodic checks, the Mini kit continues to operate as a dependable internet solution wherever it’s deployed.
10. Frequently Asked Questions (FAQs)
https://youtu.be/A62XIDHf4DM
Even though the Starlink Mini Kit is designed to be simple and user-friendly, new users often have practical questions before and after installation. These FAQs address the most common concerns about setup, performance, and everyday use. Understanding what the system can and cannot do helps users get the best experience from their connection.
10.1 Can I install Starlink Mini myself?
Yes. The Mini kit is specifically built for self-installation. Most users can complete setup in under 20 minutes using the Starlink app as a guide. The system does not require manual dish alignment, advanced networking knowledge, or special tools. As long as you choose a location with a clear sky view and stable mounting surface, installation is straightforward.
Professional installers are only necessary in special situations, such as complex rooftops, commercial properties, or permanent structural mounting. For everyday home or travel use, the kit is designed for beginners.
10.2 Does rain affect Starlink Mini?
Heavy rain or strong storms can briefly reduce signal strength, but the system is engineered to handle typical weather conditions. Light rain, heat, wind, and dust rarely cause noticeable performance issues. During extreme weather, you may experience short slowdowns or momentary interruptions, but service usually stabilizes quickly once conditions improve.
Proper placement reduces weather impact. A dish with a fully open sky view performs better in storms than one partially blocked by structures or trees.
10.3 Can it run a full office?
Yes, for small to medium offices. The Starlink Mini Kit can support video calls, cloud applications, file sharing, and multiple connected devices. Performance depends on how many users are active at the same time and what tasks they are performing.
For larger offices or high-demand environments, additional networking equipment such as mesh Wi-Fi or access points may be needed to extend coverage. Businesses that rely heavily on internet operations may also benefit from professional network setup to optimize stability.
10.4 Does it work during power outages?
The system requires electricity to operate, so it will shut down if power is lost. However, because the Mini kit uses relatively low energy, it can easily run on backup solutions such as:
-
UPS battery systems
-
Solar power setups
-
Portable power stations
-
Inverters
Many users pair Starlink with backup power to maintain internet access during outages. With proper backup equipment, the system can continue running even when grid power is unavailable.
10.5 Can I move it between locations?
Yes. Portability is one of the Mini kit’s biggest advantages. You can disconnect it, transport it, and redeploy it in a new location as long as there is power and a clear sky view. This makes it ideal for travelers, mobile workers, remote sites, and temporary setups.
Each new location may require a brief stabilization period while the dish recalibrates. As always, proper placement is essential for the best performance.
The Starlink Mini Kit is built around flexibility and simplicity. Most concerns about installation, weather, office use, power, and mobility are addressed by its portable design and automatic alignment features. Understanding these practical details helps users feel confident using the system in everyday situations. Whether deployed at home, at work, or on the move, the Mini kit is designed to deliver reliable internet with minimal complications.
10. Frequently Asked Questions (FAQs)
Even though the Starlink Mini Kit is designed to be simple and user-friendly, new users often have practical questions before and after installation. These FAQs address the most common concerns about setup, performance, and everyday use. Understanding what the system can and cannot do helps users get the best experience from their connection.
10.1 Can I install Starlink Mini myself?
Yes. The Mini kit is specifically built for self-installation. Most users can complete setup in under 20 minutes using the Starlink app as a guide. The system does not require manual dish alignment, advanced networking knowledge, or special tools. As long as you choose a location with a clear sky view and stable mounting surface, installation is straightforward.
Professional installers are only necessary in special situations, such as complex rooftops, commercial properties, or permanent structural mounting. For everyday home or travel use, the kit is designed for beginners.
10.2 Does rain affect Starlink Mini?
Heavy rain or strong storms can briefly reduce signal strength, but the system is engineered to handle typical weather conditions. Light rain, heat, wind, and dust rarely cause noticeable performance issues. During extreme weather, you may experience short slowdowns or momentary interruptions, but service usually stabilizes quickly once conditions improve.
Proper placement reduces weather impact. A dish with a fully open sky view performs better in storms than one partially blocked by structures or trees.
10.3 Can it run a full office?
Yes, for small to medium offices. The Starlink Mini Kit can support video calls, cloud applications, file sharing, and multiple connected devices. Performance depends on how many users are active at the same time and what tasks they are performing.
For larger offices or high-demand environments, additional networking equipment such as mesh Wi-Fi or access points may be needed to extend coverage. Businesses that rely heavily on internet operations may also benefit from professional network setup to optimize stability.
10.4 Does it work during power outages?
The system requires electricity to operate, so it will shut down if power is lost. However, because the Mini kit uses relatively low energy, it can easily run on backup solutions such as:
-
UPS battery systems
-
Solar power setups
-
Portable power stations
-
Inverters
Many users pair Starlink with backup power to maintain internet access during outages. With proper backup equipment, the system can continue running even when grid power is unavailable.
10.5 Can I move it between locations?
Yes. Portability is one of the Mini kit’s biggest advantages. You can disconnect it, transport it, and redeploy it in a new location as long as there is power and a clear sky view. This makes it ideal for travelers, mobile workers, remote sites, and temporary setups.
Each new location may require a brief stabilization period while the dish recalibrates. As always, proper placement is essential for the best performance.
The Starlink Mini Kit is built around flexibility and simplicity. Most concerns about installation, weather, office use, power, and mobility are addressed by its portable design and automatic alignment features. Understanding these practical details helps users feel confident using the system in everyday situations. Whether deployed at home, at work, or on the move, the Mini kit is designed to deliver reliable internet with minimal complications.
Get Expert Starlink Installation That Guarantees Perfect Performance

Setting up the Starlink Mini Kit is intentionally designed to be fast and beginner-friendly. From unboxing to browsing, most users are online in minutes thanks to the system’s plug-and-play design and automatic satellite alignment. There’s no complicated wiring, no manual dish aiming, and no technical expertise required. That simplicity is what makes the Mini kit so powerful — it transforms satellite internet from a specialist tool into something anyone can deploy. Whether you’re installing it at home, on a rooftop, or in a temporary location, the process is streamlined to remove friction and get you connected quickly.
What truly sets the system apart is its portability and flexibility. The Mini kit is not tied to one address; it moves with you. You can redeploy it for travel, remote work, rural living, construction projects, or mobile offices without sacrificing performance. That freedom changes how people think about connectivity in Kenya. Instead of depending on infrastructure availability, you carry your internet with you. But while the kit is easy to deploy, professional installation can elevate performance even further — especially for permanent mounting, commercial environments, or complex rooftops where safety and optimization matter.
For users who want the strongest signal, clean mounting, and long-term reliability, expert support makes a measurable difference. Professional installers ensure ideal placement, secure cabling, and optimized network performance so the system runs at its full potential from day one. Partnering with Spacelink Kenya means your Starlink setup is handled by specialists who understand both the technology and Kenyan installation conditions. If you want a connection that is fast, stable, and professionally deployed, this is the step that turns a good setup into a flawless one.
Table of Contents